Data validation is an Excel feature that let you set rules to guide the content of your spreadsheet. You can control what a user can input in an Excel cell and keep your data valid and consistent. This post will discuss what is data validation in Excel in-depth and also show you how to use it.
What is Data Validation in Excel?
Excel’s data validation is a feature in the Excel app that validates or restricts a user’s input to a spreadsheet. It enables owners or creators to set a validation rule for what kind of data users can type in a cell of the spreadsheet. Here are a few examples of how data validation works:
- It enables you to allow number entries within a specified range.
- You can allow date and time entries within a specified range.
- It lets you set the cell entry to numeric or text values.
- You can restrict entries to a selection from a drop-down list.
- It lets you find incorrect entries in validated cells.
- It allows you to set a specific length for the cell entries.
When you use data validation, the app will show an input message when a user selects a cell and show a warning message when they enter incorrect data in the validated cells.
How to Use Data Validation in Excel
Data validation helps to limit errors in data entry. For instance, suppose the data type for one column of your worksheet is years after the year 2000 as shown below:

You can use data validation to restrict the entry of cells in the column to 4-digit numbers from 2000, and the system will restrict any other input out of the range as seen below:

Setting up data validation in Excel is simple and here are the steps you should follow:
Step 1: Open the Excel Document
Open the Excel document to which you want to apply data validation or you can open a new document if it is best for you.
Step 2: Select the Cells to Validate
You may choose to validate a cell, column, or row, or select only a few cells to validate. To select the desired cells you want to validate:
- Click the first cell to select it.
- Hold the Ctrl key.
- Select all other cells using the mouse without releasing the Ctrl key.
- Release the Ctrl key after the selection.
You can also select a whole row or column, or select all cells within a range by:
- Clicking a cell.
- Holding the left click, and
- Dragging the mouse over the desired range till the cells have been selected.
Step 3: Select Data

Select Data at the top ribbon of the worksheet. You will find it between Formulas and Review.
Step 4: Click Data Validation
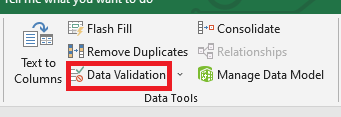
Select the Data Validation option from the Data Tools section in the toolbar. The Data Validation dialogue box will pop up on the screen immediately.
Alternatively, you can open the Data Validation dialog box by pressing Alt + D, then Alt + L.
Step 5: Create Your Validation Rule
Click the Settings tab in the Data Validation dialog box and set up the validation criteria based on your need.

In this example, we wish to set validation for 4-digit numbers greater than 2000. To do this:
- Choose the Whole numbers option in the Allow field.

- Choose the greater than or equal to option in the Data field.
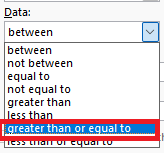
- Enter the minimum value in the minimum field.

You have successfully created a validation rule and you can click OK. However, you can click the Input Message or Error Alert tabs to customize the input and error alert messages.
Step 6: Customize the Input Message (Optional)
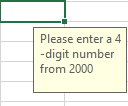
Using an input message will guide every user on what type of data they can enter when they click the cell. To customize this message:
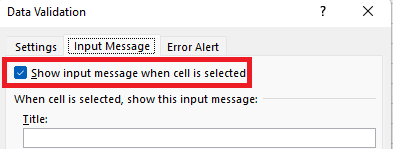
- Select the Input Message tab.

- Check the box next to the Show input message when a validated cell is selected option.

- Select the input message field and enter the desired message.

The system will show your message to users when they click on the validated cell. You can click OK to complete the setup or continue to set up an error alert message.
Step 7: Customize the Error Alert Message (Optional)
The error alert message will appear if a user enters invalid data. You can customize the error message you want them to see in this case as follows:
- Click the Error Alert tab in the Data Validation dialog box.

- Check the box next to the show error alert after invalid data is entered option.
- Click the Style drop-down and select a preferred style.

- Click the Error Message field and type the message you want users to see.
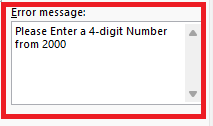
- Click OK to complete the setup.

The error message will appear on the screen if a user enters an invalid validation.

Conclusion
You can restrict users' data entry into your Excel cells with data validation by following the steps in this post.
You may also like to read:
How to Switch First and Last Names in Excel with Comma
How to Insert a Signature in Excel
How To Remove Empty Cells In Excel
How To Change Date Format In Excel To dd/mm/yyyy